Enter daily timesheets to track what work you completed for each date for either Project related work, or internal <Office> tasks. Enter the amount of time spent on each task, and type a note to describe the work completed that can be displayed on the Project invoice sent out to the client.
Setup required before use |
Who Can Use It? | Where Is It? |
---|---|---|
User Assist. Project Manager Project manager Director Administrator System Administrator |
Timesheets > Daily Timesheet |
Tips:
Enter timesheets to record how many hours you spent working on project tasks. When the transaction is linked to a project the transactions can be viewed under the Project > Time and Expenses tab for all staff. Use the <Office> project to enter time spent on internal tasks such as General Administration or Leave.
Use the history rows to quickly enter new timesheets using projects use in timesheet within the last week, or copy the timesheet from an alternate date if you are entering similar entries today.
Record how long you spent working on each Project task.
Click the image above to view the daily timesheet screen.
Tips:
Press F4 to toggle the Project Name column between sorting on the project number or project name. Learn how to change the default sort.
The lower half of the timesheet screen shows the timesheet history for projects, sub project and tasks that have been used in the past 7 days. History rows are shown in grey text. Use the history rows to quickly enter timesheets for projects you are continuing to work on from the previous week.
Tips:
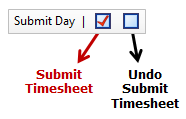
Use the submit day button to save all the entered timesheet items to WIP. The Undo submit timesheet button will remove the items from WIP, to allow the user to update the transactions. The Undo Submit Timesheet button will only function for items that are not in declined, invoiced, written-off, or queried status.
When not using approvals:
The day is automatically
submitted upon saving the timesheet, if your staff login account has 'auto
complete timesheet' box checked (by your System Administrator). If this
setting is unchecked, then the user will need to select the Submit Timesheet
icon to commit the entries to WIP, once they have completed the days timesheet.
When using approvals:
Select Submit Timesheet to submit the day, after saving the timesheet. This will send all the new items to the manager for approval. Use the Undo Submit Timesheet to allow edit of the transactions, then update the item and resubmit the timesheet to the manager for approval.
Once the manager has approved the timesheet, the Undo Submit Timesheet button will not unlock the transactions (as approved entries can only amended with a Transaction Query). Locate transaction approvals topic to learn more.
Tip: Make sure you submit all timesheet entries. Only submitted transactions will be included as WIP against the project, and be ready for invoicing.
Click the image above to view the Copy Daily Timesheet window.
Tip: You will see the date appear on the lower grid. Double click the transaction to remove it , if you've selected the wrong date.
Timesheet entries can be calculated using a method called start and end times. The first entry for the day will start at the nominated time in System settings and upon entering the end time, the duration or total hours for the timesheet entry will be calculated.
The next entry will then automatically start at the end time of the previous entry.
Tip: Double click to fill in the current time: start a new entry, select the From time, then double click the time. Automatically the current time will appear. Repeat also at the End time. This will then calculate the absolute correct duration for the single entry.
Track how many extra hours your work each day using overtime rates. Overtime can be entered in your timesheets for extra hours worked on Project tasks or internal <Office> tasks.
The overtime rates setup in your system can either increase the charge-out value of the work to your client, or increase the cost of you completing the work. Samples of overtime rates are:
Tips:
If overtime rates is NOT enabled in Synergy, then you will enter your timesheet hours as below.
This example shows that the staff member worked 2 hours overtime.
The above timesheet entry is for 10 hours - however the staff member should work only 8. 2 hours needs to be allocated as overtime.
If overtime is enabled in the system, you will be able to select which overtime rate to apply to the entry from the drop down list.
When you work on the same timesheet task for both 'standard' hours and 'overtime' hours, then you will need to enter this as two timesheet entry rows.
The time and expenses tab for the project shows each overtime entry with a checkmark and which overtime rate was selected. This makes it easy to see in the project, or your transaction reports the details of the overtime rates.
Complete the following steps to enter a site inspection
Use the Print button in the toolbar to create a report of all your entered timesheets.
Click the image above to view the Timesheet Report window.
Click the image above to view a sample of a timesheet report.
Tip: The default timesheet report selected by your System Administrator is used by this feature. Change the default report for all users in System Settings > Time and Expenses > Time and Expense Reports.
When using approvals <Office> project timesheet transactions will be shown as locked. This occurs as no project manager is responsible for the <Office> project to complete the approval. A system administrator or staff manager can unlock a users timesheet entry that has been allocated to the <Office> project and adjust the entry if required. The approvals topic outlines more details on how to use this feature.
If approvals is active in Synergy, then each timesheet transaction entered will be approved by a manager. If the manager requires more information about the timesheet transaction, or it has been entered incorrectly they will decline the timesheet transaction. When a timesheet is declined the declined status symbol is shown. Use the matching toolbar button to update the timesheet transaction after reviewing the reason that the manager declined the original entry. The approvals topic outlines more about this feature, and how to resolve declined time and expense items.
The query status symbol is shown if the Project Manager has entered a question about why the timesheet entry exists for the project. This is commonly done if the project manager requires more information about the timesheet entry before they can invoice it to the client. Use the resolve transaction query to view the manager's question, and add a note answer back in reply. Learn more about transaction queries.
Tip: When Project Phases are active on a project, the Phase name is shown with the Sub Project names in the Sub Project drop down list. This makes it easy to find the sub project you are looking for, if the same Sub Project name is used in multiple phase groups.
Looking for more help? Try reviewing the following topics: View Topics
© 2019 Total Synergy Pty Ltd