These settings relate to your office name and contact details and the location of the Synergy directory, invoicing and credit numbering and Project prefix defaults.
Tips:
The name is what you will see on reports and throughout the database if you're using multi offices. You can change the (Default), it will remain in bold to differentiate the others as the default.
The operating as appears on reports and in the My synergy user welcome plugin. This field cannot be changed as this draws from the license which is based on the License Agreement. Please discuss with your sales rep should you need to change this.
By adding phone and fax here, for each staff member that is created, these fields will copy over automatically. So if you have multiple offices, create all the staff for one office and then change the contact details and add the remaining staff.
When the database is first created, so too is a Synergy directory. This is a folder positioned on the file server where all staff can access Project folders, where MS Word® invoices are saved and where version control occurs for PCs as they connect to the database.
|
Synergy |
Backup |
auto generated backup is stored here |
|
|
Client Files |
Version control pushes out files to the PCs after an upgrade occurs |
|
|
Client application |
This is a copy of the client installation and is updated each time the database server is upgraded |
|
|
Export |
accounts interface files are stored here |
|
|
Invoices |
MS Word® document invoices are saved here |
|
|
Projects |
folder and sub folders created here |
|
|
Templates |
all Contract, invoice, fax and letter templates are stored here |
This will be the UNC path for the Synergy folder. NOTE the folder name Synergy does not need to be included here. An example of the UNC path would be \\SERVER01\Data\Company. The Synergy folder would reside within the Company folder in this example.
Should you need to move the Synergy directory from it's current position, refer to the topic Move the Synergy Directory.
*Synergy Enterprise Feature*
Set the location of where the controlled files will be transferred to. This may be in a different location to the Synergy directory stored on the Network tab.
If you've already started using Controlled file management and you now wish to move the Controlled directory to a different location than within the Synergy directory there's a few changes to be made.
Example
TRANSFER \\SERVER01\Synergy\Controlled TO \\SERVER01\TS secure (etc)
The library is currently set to \\SERVER01\Synergy\Controlled and files have been save to this location. You now want the Controlled directory to reside at \\SERVER01\TS secure - here's what you need to do.
This will set the default location where all files will be transferred to when wanting to use the Controlled feature of Document Management.
We strongly recommend a new user be created on your domain called Knowledge Manager. This person maintains a specific role in relation to Document Management however is not necessarily IT personnel, as the user will need to be aware of the use of the Synergy product and your business processes.
What does the Knowledge Manager do
Tip: Contact Total Synergy Support to request Document Management to be enabled in your Synergy license.
You can elect to use the system wide invoice settings, which essentially means even though there is 2 or more offices, they generate invoices out of the one numbering system. Change only if the additional office needs it's own numbering sequence - perhaps due to synchronising to a different accounting file.
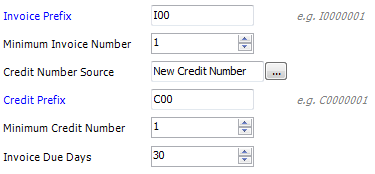
Invoice Prefix
Enter invoice number prefix and invoice number counter starting point. The prefix enables sequential numbering within each Prefix entered. This is useful when entering Historical Project financials, as part of a data conversion i.e. PRE, SYD, 000.
Minimum Invoice Number
Enter the next number that should be sent out to a client i.e. if the last invoice sent was SYD02030, then this field will be 02031.
Credit number source
As credits are produced a number is generated. Here you can nominate what this will be as this will flow through to your accounting package
Credit Prefix
When the New Credit Numbering system is used allocate a 3 digit prefix i.e. ADJ, C00 etc.
Minimum credit number
If already using credit numbers, enter the next number that should be sent out to a cli.e.nt i.e. if the last invoice sent was ADJ02030, then this field will be 02031.
Enter the Default payment due days here. At the time of invoicing if this setting is different to the default, make a selection from the list in the drop down box.
As a project is created, firstly you select the prefix and then upon saving the project number is allocated. However this setting allows you to set the default prefix, so when a project is created, the prefix is already selected.
An option exists here also for <current year> which when selected will roll over to the new calendar year automatically. So come early Jan 2018 will automatically be assigned. This option would be used in the case your project prefixes are the calendar year i.e. 2018 etc.
Use the calendar tab to define the default working days and number of hours for each office. This is available at an office level, so that this setting can be different for each location that you operate within. The calendar settings defined are used within the Resource and Capacity Management module (*Synergy Enterprise clients only*). ![]() NEW 4.8
NEW 4.8
*Synergy Enterprise Feature*
Tips:
Browse the Synergy directory. If you're unable to open the directory through, it either doesn't exist or is not shared and therefore cannot be seen or it has been renamed.
Create the sub directories within the Synergy folder required to keep the Synergy database functioning. Without these sub directories, document templates, invoices and Project directories will not be created.
There is a function that will create a Project folder for all Active and Proposal status Projects on the specified network server. Refer to Project folders topic for more information.
The filter
A filter has been added to the rebuild function for Project folders. This enables a user to select a screen filter and/or select particular Projects requiring the rebuild.
Refer to Office settings in Administration tools for more if you are using Multi Offices.
Looking for more help? Try reviewing the following topics: ![]() View Topics
View Topics
© 2019 Total Synergy Pty Ltd